Sitecore XP 10 Installation with SIA to a different folder
Sitecore Installation Assistant(SIA)
SIA is a user interface that assists developers, in installing Sitecore XP Developer Workstation (XP Single) and Sitecore XM Developer Workstation (XM Scaled). The SIA was released along with Sitecore 9.2 and it instantly became popular among the developer community as this tool simplifies the installation to a great extent. The tools save a lot of time compared to SIF as it assists developers to review system requirements, install the prerequisites, and complete the installation process.
Steps to Install
You can download the Sitecore 10 package from here.
The steps to install Sitecore XP 10 is no different than the previous version (i.e. Sitecore 9.3). Refer to my blog here if you want to install with the default configurations.
Steps to install Sitecore XP 10 to a different directory
At this time, I had to install Sitecore XP 10 to a different directory, rather than the default web-root folder.
This led to several challenges during the installation. Follow the below steps carefully, and the installation should happen in a smooth manner.
Extract the download package to a folder.
Open the setup.exe.config file in a text editor. (Notepad or Notepad++)
Under the template node, there will be several parameter nodes.
<template name="XPSingle" path=".\XP0-SingleDeveloper.json">These parameters can be changed the way you want to modify the installation. For example, I needed a change in the site name for the Sitecore instance. I had to modify the format for the SitecoreSiteName parameter.
In this case, the Site Root directory hasn't been listed in the parameters at all. So, we have to add the parameter by ourselves.
Add the below parameter node inside the template node.
<template name="XPSingle" path=".\XP0-SingleDeveloper.json">
      <!-- All other nodes removed in between -->
	  <parameter name="SitePhysicalRoot" value="D:\Inetpub\wwwroot" />
  </template>
This parameter is actually enough to modify the installation. But when installing SXA alongside, the below changes are also required.
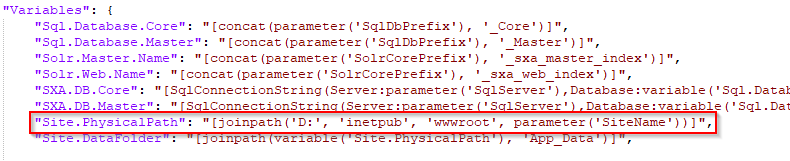
Open the file sxa-XP0.json in a text editor.
Under the Variables node, modify the Site.PhysicalPath variable to the desired value. (Note: It must be the same as the value used earlier for SitePhysicalRoot). Check the highlighted part in the below image.
After this step, proceed with the default installation steps and your instance should be installed in the desired folder.
Happy Sitecoring!