Sitecore Experience Commerce 9.3 Installation - On-Prem
What is Sitecore Experience Commerce?
Sitecore Experience Commerce (XC) is an e-commerce solution, built on the Sitecore Experience Platform (Sitecore XP). The Sitecore XC solution provides a core framework for rapidly delivering commerce functionality through the following components:
Commerce Engine An extensible commerce core framework, hosting commerce services such as Cart, Order, Pricing, Promotions, Catalogs, and Inventory. The Commerce Engine includes a pluggable framework for extending the engine to modify or add to existing functionality.
Commerce Business Tools A set of rich business tools for merchandisers and customer service representatives. The business tools are built on the Angular framework, and can also be extended using the same pluggable framework.
Sitecore Experience Accelerator (SXA) Storefront A sample storefront website that is integrated with the Commerce Engine. You can use the SXA Storefront as a starting point for building a customized storefront.
Hardware Requirements
4 core processor, 16 GB of RAM
Hosting environment requirements
OS: Windows Server 2016/2019, Windows 10 Professional (64-bit)
.NET Framework:
.NET Framework 4.7.1 Developer Pack (including available updates)
ASP.NET MVC 5.2 or later
ASP.NET Core 2.1
.NET Core Windows Server Hosting 2.1.6 or later versions of 2.1
OData 7.2.0
Database: MS SQL Server 2016 SP2/2017/2019, Azure SQL Redis Data Store
Web Server: IIS 10.0, Web Deploy 3.6, URL Rewriter (Download here)
Solr: Solr 8.1.1
Preparing your installation
Install a clean instance of Sitecore XP 9.3 with SIA. (Refer to this article) Install SXA as well. Although Sitecore XC installation does install SXA. For some reason, we face issues if SXA is not installed.
Check if your indexes are working fine. (Go to Control Panel > Indexing Manager > Rebuild all indexes, make sure there are no errors).
Download and Install Redis from here. You can check for other available versions here.
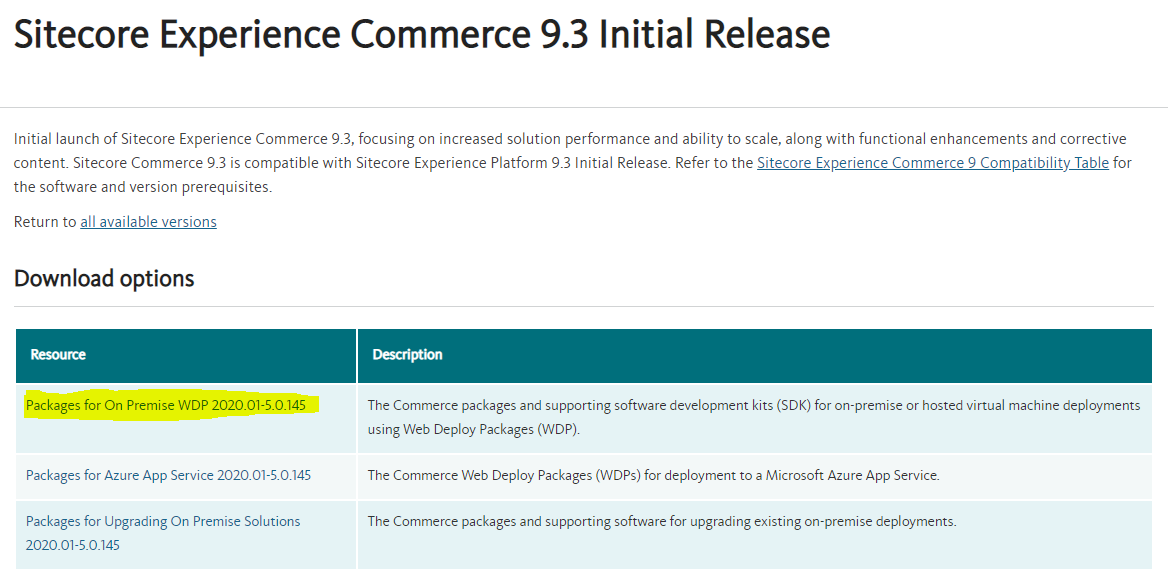
Download the Experience Commerce release package (Packages for On-Premises 2020.01-x.x.xxx) from here.
Unzip the package to a new folder (e.g. C:/Deploy) as there are going to be a lot of zip files after the extraction. Consider this folder as your local deployment folder.
Download the following software and copy them to your local deployment folder:
MSBuild Microsoft Visual Studio Web targets from Nuget. Click on Download Package - on the right side of the page.
NOTE: The Sitecore PowerShell Extensions 6.0 and the Sitecore Experience Accelerator 9.3 packages will also be downloaded in the Sitecore XP Installation. You can just copy them from there to your local deployment folder to save yourself some time.
Copy the Nuget Package for MSBuild Microsoft Visual Studio Web targets to the local deployment folder, and extract the package. Use 7Zip to unzip the package, make sure to use the Extract to <Folder_Name> option.
Deployment
Extract the content of the SIF.Sitecore.Commerce.zip file to a folder (e.g. C:/Deploy/SIF.Sitecore.Commerce).
Open the SIF Sitecore Commerce folder.
Create a copy of the file Deploy-Sitecore-Commerce.ps1 (Rename it as My-Deploy-Sitecore-Commerce.ps1), and open it with a text editor.
Set
$SkipInstallDefaultStorefrontand$SkipDeployStorefrontPackagesas$trueif you do not want to install the SXA Storefront.Generate a client authentication certificate with the below Powershell script and copy the generated value.
$bytes = New-Object Byte[] 32
$rand = [System.Security.Cryptography.RandomNumberGenerator]::Create()
$rand.GetBytes($bytes)
$rand.Dispose()
$newClientSecret = [System.Convert]::ToBase64String($bytes)
Write-Host $newClientSecret
If Sitecore XP was installed with SIA, we need a lot of changes to be made in the parameters.
I have modified the variables aligning it to SIA, below are the modified values. Change the mentioned variables one-by-one and read the comments above them carefully.
# The prefix that will be used on SOLR, Website and Database instances. The default value matches the Sitecore XP default.
# Change the value with the prefix you used during Sitecore XP Installation
[string]$SiteNamePrefix = "sxc93"

# The name of the Sitecore site instance.
# The value needs to be changed to align with SIA configuration.
[string]$SiteName = "$($SiteNamePrefix)sc.dev.local"

# Identity Server site name.
# The value needs to be changed to align with SIA configuration.
[string]$IdentityServerSiteName = "$($SiteNamePrefix)identityServer.dev.local"

# The Commerce Engine Connect Client Secret for the Sitecore Identity Server
# The client secret generated earlier
 in Step 5
[string]$CommerceEngineConnectClientSecret = "+nxrvr2tX8ZRXXK5xpIyWxY5hngGvqb1dN2QtSVCHvQ="

# The host header name for the Sitecore storefront site.
# Change the hostname if required
.However, I'd suggest using the same value.
[string]$SiteHostHeaderName = "sxa.storefront.com"

# The path of the Sitecore XConnect site.
# The value needs to be changed to align with SIA configuration.
[string]$XConnectInstallDir = "$($Env:SYSTEMDRIVE)\inetpub\wwwroot\$($SiteNamePrefix)xconnect.dev.local"
Other than these, the below variables need to be changed as per configuration.
# Database configuration

# The prefix for the Sitecore databases
# With the default configuration, it will be $SiteNamePrefix
[string]$SqlDbPrefix = $SiteNamePrefix

# The location of the database server where Sitecore XP databases are hosted.
# In case of named SQL instance, use "SQLServerName\\SQLInstanceName"
[string]$SitecoreDbServer = "$($Env:COMPUTERNAME)\\SQLEXPRESS"

# If it is not a named instance, use the below value
[string]$SitecoreDbServer = $Env:COMPUTERNAME

# SQL user with sysadmin privileges, "sa" by default
[string]$SqlUser = "sa"

# Password for the above user
[string]$SqlPass = "@sqlServerPassword!"

# Sitecore credentials

# The name of the Sitecore user account.
 ("admin" by default.)
[string]$SitecoreUsername = "admin"
# The password for the $SitecoreUsername.
[string]$SitecoreUserPassword = "b"

# Solr Configuration

# The prefix for the Search index. Using the SiteName value for the prefix is recommended.
[string]$SearchIndexPrefix = $SiteName

# The URL of the Solr Server.
[string]$SolrUrl = "https://localhost:8983/solr"

# The folder that Solr has been installed to.
[string]$SolrRoot = "$($Env:SYSTEMDRIVE)\solr\sc93solr-8.1.1"

# The name of the Solr Service.
[string]$SolrService = "sc93solr-8.1.1"

# The prefix for the Storefront index. The default value is $SiteNamePrefix.
[string]$StorefrontIndexPrefix = $SiteNamePrefix

# Commerce Database Configuration

# The location of the database server where Commerce databases should be deployed.
# In case of named SQL instance, use "SQLServerName\\SQLInstanceName"
# Use the $SitecoreDbServer, if using the same database server
[string]$CommerceServicesDbServer = $SitecoreDbServer
The Redis configuration need not be changed if it was installed with the default configuration.
Restart the Sitecore Identity Service, in the IIS Manager.
NOTE: Do not access the identity service until you run the deployment script.
Run Powershell as Administrator and change directory to your /SIF.Sitecore.Commerce.x.x.xx folder.
Run the deployment script.
cd <local deployment folder>/SIF.Sitecore.Commerce.x.x.xx
.\My-Deploy-Sitecore-Commerce.ps1
After the installation completes, log in to Sitecore and open the Launchpad.
If you had changed the value for
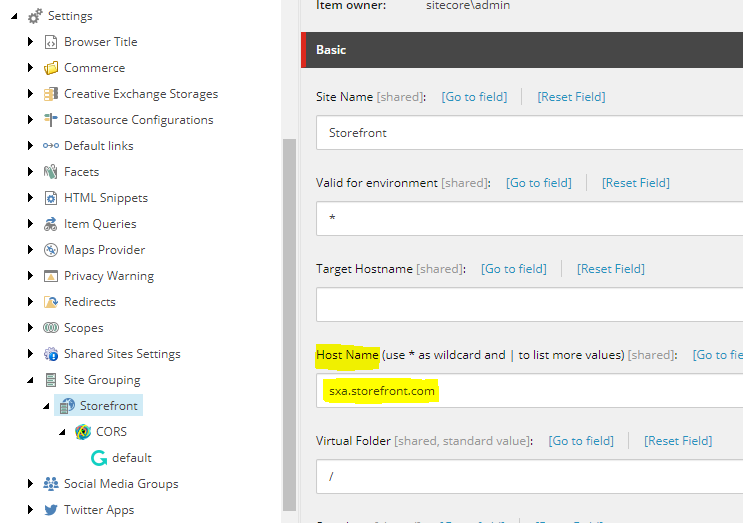
$SiteHostHeaderName.Open the Content Editor.
Go to the item path
/sitecore/content/Sitecore/Storefront/Settings/Site Grouping/Storefront.Change the value of Hostname to the value used for
$SiteHostHeaderName.
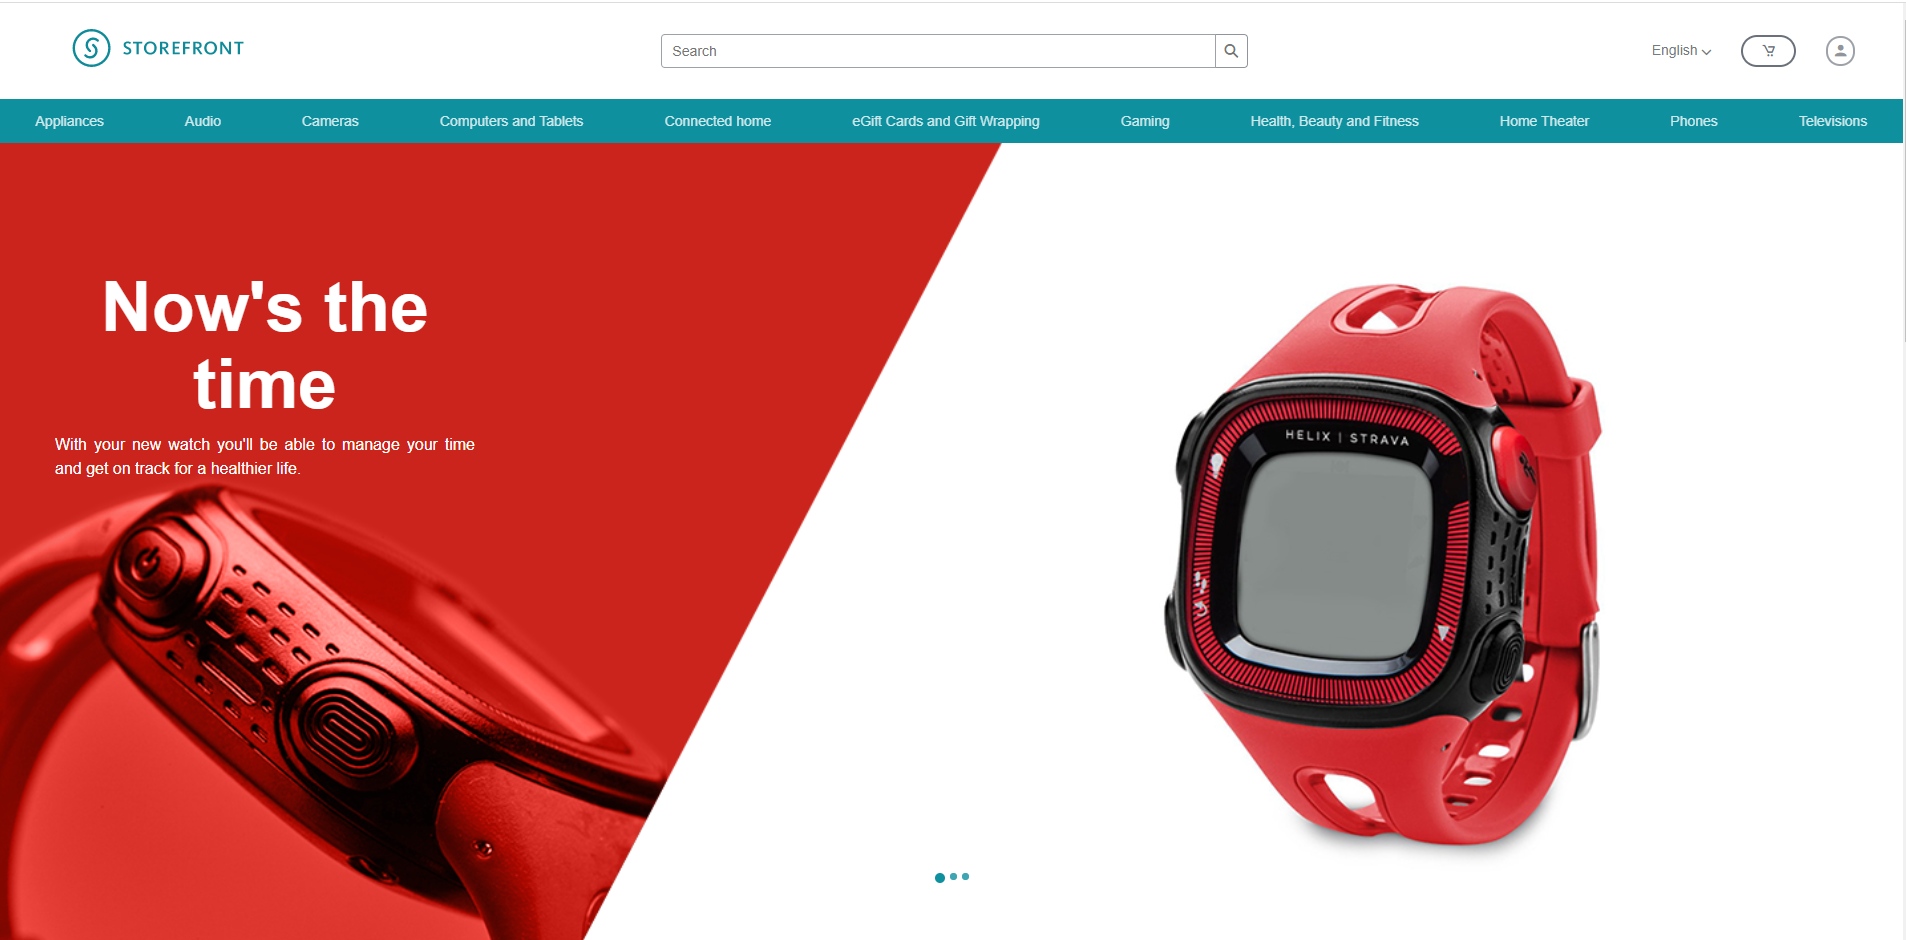
Open the Storefront site with the hostname used in the previous step.
Issues Faced during Sitecore Experience Commerce 9.3 Installation
I have listed below some of the issues I and my colleagues faced during installation. Also, the solutions as well.
Commerce-Engine-Initialize_Bootstrap failed - https://commerceops_sc9.com/bootstrap() is failing
This issue was occurring, as my SQL Instance is a named instance.
The solution was simply to modify the script parameters for $SitecoreDbServer to "$($Env:COMPUTERNAME)\SQLEXPRESS". I was earlier missing the escape slash.
I had to uninstall the Sitecore XC and XP Instance completely and run the script again for the installation to work.
Commerce-Engine-Initialize_EnsureSyncDefaultContentPaths failed
Ensure/Sync default content paths for environment AdventureWorksAuthoring failed, please check Engine service logs for more info.
When I checked the engine logs, the error was as below:
0016 14:26:42 ERROR CtxMsg.Error.EntityNotFound: Text=Entity 'Entity-CommerceEnvironment-HabitatAuthoring' was not found.
00016 14:26:42 ERROR PipelineAbort:Entity 'Entity-CommerceEnvironment-HabitatAuthoring' was not found.
00026 14:27:41 ERROR SitecoreConnectionManager.Error: Message=An error occurred while sending the request.
|Trace=   at System.Runtime.ExceptionServices.ExceptionDispatchInfo.Throw()
System.Net.Http.HttpRequestException: An error occurred while sending the request. ---> System.Net.WebException:
The underlying connection was closed: An unexpected error occurred on a receive. --->
System.IO.IOException: Unable to read data from the transport connection:
An existing connection was forcibly closed by the remote host. ---> System.Net.Sockets.SocketException:
An existing connection was forcibly closed by the remote host
The below steps solved the error:
Run
iisreset.Open the <local_deployment_folder>\SIF.Sitecore.Commerce.4.0.31 \Configuration\Commerce\Master_SingleServer.json file in a text editor.
In the Includes part, delete all the tasks till CommerceEngine-Initialize.
Run the installation script now.
The installation should now complete successfully.
Commerce-Engine-Initialize_EnsureSyncDefaultContentPaths failed
Ensure/Sync default content paths for environment AdventureWorksAuthoring failed, please check Engine service logs for more info.
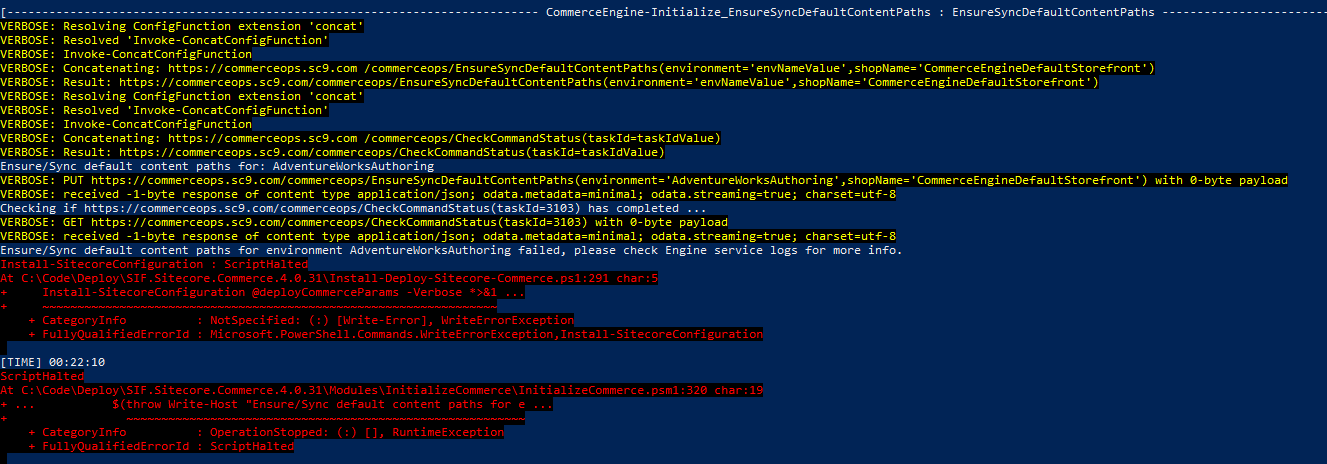
This was an issue that a colleague of mine faced. The logs had the below lines.
00011 14:22:57 ERROR Management.block.getitemsbypath.Error:
Message=ERR unknown command 'EVAL'|Trace=   at System.Runtime.ExceptionServices.ExceptionDispatchInfo.Throw()
at System.Runtime.CompilerServices.TaskAwaiter.HandleNonSuccessAndDebuggerNotification(Task task)
   at Microsoft.Extensions.Caching.Redis.RedisExtensions.<HashMemberGetAsync>d**2.MoveNext()
The error was that the installed Redis server was outdated. The below steps solved the error:
Uninstall the existing Redis service.
Download and install the latest version of Redis from here.
Uninstall the Sitecore XC and XP instance.
Rerun the whole installation again.
The installation should now complete successfully.
Please do let me know in the comments if there are any comments/suggestions.
Happy Sitecoring!